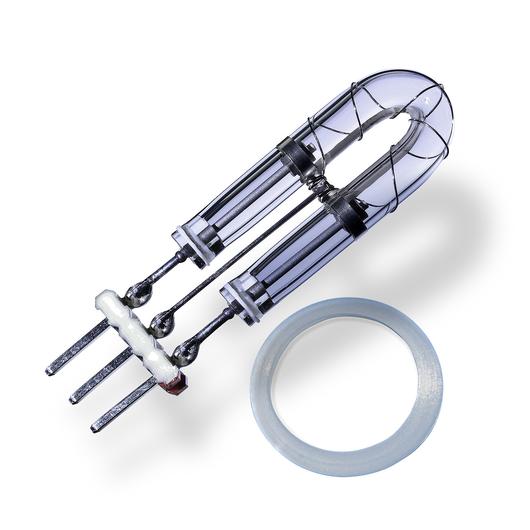
美国蒙那多频闪仪灯炮和保险丝的更换方法
频闪仪灯泡L-1903更换方法
警告:
在尝试卸下美国蒙那多(美国monarch instrument)频闪仪灯泡之前,请确保已关闭频闪仪,并且已从交流电源插座上拔下了电源线。让灯泡冷却至少1分钟。频闪仪设计用于在30秒内释放内部高压。但是,更换灯泡时应格外小心,操作时遇到问题可咨询上海峰志仪器有限公司。
只需使用小螺丝刀即可更换频闪仪灯泡。无需卸下任何螺钉即可更换灯泡。每个新的DA +或DB +随附一个新的备用灯泡L-1903。

美国蒙拿多频闪仪灯管L-1903
更换美国蒙那多频闪仪灯泡L-1903的步骤:
1.推开反光镜外壳侧面的两个凸耳,并使用小螺丝刀卸下前透镜,以撬起一个凸耳并提起透镜。注意不要撬动标签,超出释放镜头所需的数量。反光镜由前透镜固定在适当的位置,会松动,但不必卸下反光镜。
2.用布在食指和拇指之间握住灯,并在拉出时轻轻前后摇动它。请勿尝试旋转灯泡。灯泡已插入插座,拉动时很容易熄灭。
警告:请勿用裸露的手指触摸频闪仪新灯泡。
3.灯是两极的,必须按照极性插入插座。使用不起毛的布将插头上的红点与插座上的红点对齐,然后轻轻地前后摇动灯泡,同时将其推入到位(请参见图6)。确保灯泡笔直并在反光镜孔中居中。
注意:请勿让频闪仪反射镜接触灯泡。
 、
、
4.重新安装反光镜,然后将前透镜放置在适当的位置,使其与透镜上的凹口与外壳上的两个小卡舌对齐,以防止透镜旋转(请参见图6)。向外推动前缘上的卡舌,然后将镜头按入到位。
蒙拿多频闪仪的保险丝更换
设备内部有一个5 x 20mm的保险丝,可通过卸下透镜和反射镜来进行维修(请参阅第5.1节)。在正常工作条件下,保险丝切勿烧断。异常操作条件的例子可能是异物进入频闪灯,例如水,墨水等。如果需要更换保险丝,请仅使用相同的保险丝进行更换。
保险丝的类型:
电池供电:慢速熔断-3.15A保险丝(部件号1062-3004-001)
交流电:快速熔断-750mA保险丝(部件号1062-0201-001)
上海峰志仪器有限公司现货供应美国蒙拿多频闪仪灯泡L-1903,。
LAMP AND FUSE REPLACEMENT
Stroboscope Lamp Replacement
WARNING: Before attempting to remove the lamp, make sure the stroboscope is turned off and any mains cord is removed from the AC outlet.
Allow the lamp to cool waiting at least 1 minute.
The stroboscope is designed to discharge the internal high voltages within 30 seconds. However, caution should be exercised when replacing the lamp.
The lamp can be replaced by using just a pocket screwdriver. It is not necessary to remove any screws to replace the lamp. A new spare lamp is supplied with each new DA+ or DB+
Strobe Kit.
To change the lamp:
1. Push apart the two tabs on the side of the reflector housing and remove the front lens using a small screwdriver to help pry one tab and lift the lens. Take care not to pry the tab
any more than is necessary to free the lens. The reflector is held in place by the front lens and will come loose, but is not necessary to remove the reflector.
2. Hold the lamp with a cloth between your forefinger and thumb and rock it back and forth gently while pulling out. Do not attempt to rotate the lamp. The lamp is socketed and will come out easily when pulled.
WARNING: Do NOT touch the new lamp with bare fingers.
3. The lamps are polarized and must be put into the socket matching polarity. Using a lint free cloth, match up the red dot on the plug with the red dot on the socket and
gently rock the lamp back and forth while pushing it into place (see Figure 6). Make sure the lamp is in straight and centered in the reflector hole.
CAUTION: Do NOT allow the reflector to contact the lamp.
4. Reinstall the reflector and then position the front lens in place matching up the notches on the lens with the two small tabs on the housing to prevent lens rotation (see Figure 6).
Push the tabs on the front rim outward and press the lens into place.
Fuse Replacement
There is a 5 x 20mm fuse inside the unit which may be accessed by removing the lens and reflector (refer to section 5.1). Under normal operating conditions, the fuse should never blow.
Examples of abnormal operating conditions would be foreign materials entering the strobe, such as water, ink, etc. If the fuse needs to be replaced, replace only with a fuse of the same
type and value:
Battery Powered: Slow Blow - 3.15A fuse (part# 1062-3004-001)
AC Powered: Fast Blow - 750mA fuse (part# 1062-0201-001)


 添加微信咨询!